by J Floor Anthoni (1997-2005)
www.seafriends.org.nz/phgraph/intro.htm
Many skills are needed in order to become
a good underwater photographer. This section looks at a number of issues
that are not directly related to the actual taking of a photo, such as
diving skills, your buddy, the camera housing, managing your resources,
expedition skills, the weather and much more.
In order to be creative, you must have enough diving experience to
feel safe. You must be able to lug a large camera with lights along, do
all things with one hand and be fit enough to make multiple dives on a
day.
Dive etiquette requires you to dive with a buddy which could be a good
and a bad thing. What do you expect of your mate? Can you be trusted to
dive alone?
Light is all we see and from it we conclude the shapes of things. A
camera does likewise but it produces a flat picture. For this course you
are supposed to know how all this works, but we haven't told you yet. Maybe
sometime . . .
Welcome
and good luck For over thirty years, underwater cinematography
and photography have held a never ending fascination for me. It allowed
me to share my experiences with others, to learn more about the underwater
world and to maintain an accurate record for later reference. In this section
I'd like to share my experiences with you, hoping that you won't make as
many mistakes as I did. I have included the hard-to-get theory of light
under water, tips, mechanical solutions that you can make in the home workshop,
diving techniques and more. I am not ashamed to show my mistakes and of
course, I am delighted to show my successes as well.
Many books about underwater photography have appeared
and disappeared, the earlier ones being the most thorough. Many articles
devoted to underwater photography have been printed in dive magazines,
yet the information you'll find in this section is hard or impossible to
glean from elsewhere.
My interest has always been in the biology and
ecology of the sea. It is the reason why I have concentrated on taking
pictures of organisms, how they live, what they do and how they all relate
together. I have not been interested in photographing people under water
because they do not live there. But a diver in the frame can contribute
to the excitement of the moment and translate the viewer's feelings. I
have endeavoured to make my photos look like the underwater world, with
its transparency and depth, rather than resorting to effects caused by
enlarged contrast, distortion and the like. It has also always been important
to me to bring back good results for very little waste, which may explain
why I have spent much effort in improving techniques, skills and my equipment.
You may wish to take photos of what people do,
their work or of fashion products, dive products or you may wish to document
your own research. Whatever your motivation, you will find yourself in
that ever changing optical medium, the sea water. You cannot escape the
effects it has on your photography and you will need to equip yourself
with the knowledge and skills to take good pictures inside this medium.
You will need to be a good diver, able to manage
precious resources such as body heat and air. You will dive with or without
a buddy and carry an underwater camera that may give you more trouble than
pleasure. You will need to gain expedition skills to go out to pristine
natural places. You'll need to spend money and you'll need luck too. In
this chapter we'll look at general issues - what you need to have,
know, and do.
Good luck,
Floor Anthoni.
Diving
skills Photography is a creative activity exercised in a hostile, even potentially
fatal environment. The American psychologist Maslow discovered that, in
order to be creative, a number of human needs must be fulfilled first (see
box below). One needs to be safe, well fed and socially recognised (loved,
esteemed, valued). When diving, particularly the most important need, that
of being and feeling safe, is easily upset. Humans' greatest fear is that
of suffocating, because within minutes death will follow. A diver who does
not feel safe, can never become creative. Divers who cannot hold their
breath for a considerable amount of time will never feel safe. Divers who
cannot snorkel-dive to ten metres or more will never be adequate divers.
So learn breath-hold diving first and keep practising. Besides, almost
half of your photo opportunities occur while snorkelling and for most photos
on SCUBA, you'll need to hold your breath to minimise movement blur.
Divers trained in warm and tranquil tropical seas will not have the
skills needed in cold temperate seas with currents and waves. Here they
need to wear a thick wetsuit with a heavy weight belt, and they need to
master the art of buoyancy compensation. In these conditions it is important
to adapt the weight on your weight belt to suit the occasion - whether
you go deep, need to weigh yourself down in currents and whether you carry
extra heavy batteries and so on. When pushing a camera with strobe and
auxiliaries through the water, much water friction needs to be overcome
and you need to be physically fit to do so. If you are a smoker, you will
most likely never become an successful underwater photographer. If you
fear the swimming back to the boat along the surface, you'll start with
a serious handicap.
You'll need to have the skills to avoid making dust - settling on the
bottom and leaving it. You'll need to be happy to do all dive operations
with one hand only, leaving the other free for the camera. You may need
to change the hoses on your regulator around to do so and you may need
a small side exhaust regulator for left- and right-handed use while allowing
you to press your face closer to the camera (which also steadies it better).
You may need to have a split lens mask with close-up lenses in the lower
half, in order to be able to read the fine camera controls and settings.
The American psychologist Abraham
Harold Maslow (1908-1970) is best known for his self-actualisation
theory of psychology, which argued that the primary goal of psychotherapy
should be the acceptance and integration of the self (id).
In his major works Motivation and personality (1954)
and Toward a psychology of being (1962), Maslow argued that each
individual's basic needs must be satisfied first before being able to be
creative and self-actuated. He also established an order of importance
between these needs. As each following need is satisfied, the next higher
level in the emotional hierarchy dominates conscious fuctioning. Thus,
people who lack food or shelter or who cannot feel themselves to be in
a safe environment, are unable to express higher needs and to ultimately
fully integrate the components of their personality.
His proposed sequence of needs has often been criticised
but as a concept has been widely accepted.
Safety: immediate threats to life like suffocation,
war, fights. Not feeling stressed.
Food/water: a sufficient level of nutrition and having
fed recently; not feeling hungry or thirsty.
Esteem: belonging to a group/family, being loved and
playing a role, being needed.
Creativity: being creative, able to learn, to be a
self-actualiser, playing.
Your buddy
and diving alone If you wish to take shots of a model, your buddy is very important.
Besides, it is considered safer to dive with a buddy. But is your buddy
really adding to your safety? Many serious photographers dive alone.
They have trained themselves to cope with every kind of failure except
for heart failure. They are the best divers around. Think about it.
Your buddy can help you carry your gear, hold your lights under water,
add interest to your shots and share your experience. But a buddy also
brings twice the disturbance, dust and worries. If your buddy runs out
of air, gets colder or fatigued faster than you do, you've got a
liability. Spend time training your buddy and don't change them too frequently.
Otherwise it is better (and safer) to dive alone.
The buddies and models of advanced photographers receive a lot of flak
under water and often after the dive too. Somehow they never seem to do
things right. Often the impatient photographer is blamed, but does your
model know what skills she must have and what is expected of her? It is
my experience that a model needs about two years of training and practice
before becoming a true asset for every dive. So here is a list of what
she needs to be able to do (I assume a female model here for ease of writing):
air consumption: the model must use her air at about the same rate
as the photographer. To her delight she will be able to excel because her
bodyweight is less, her lungs are smaller and she does not need to push
a camera. Skip-breathing (see box below) is what all good photographers
do to to extend their time under water. It also helps making less bubble
noise. Likewise a buddy must learn this technique without getting a headache.
fitness: fitness remains important but it depends on what you do.
I've seen very unfit underwater photographers taking good photos with a
lot of surface support. But this doesn't increase your chances. It
is quite common to swim a couple of hundred metres with all gear on at
the surface, to breath-hold dive to ten metres and take a photo. In general,
your buddy must be matching your fitness.
distance: how far should the distance between you and your buddy
be? It depends. When scouting along, she can be leading up front, finding
new subjects, but never above (or at least very carefully), because debris
could rain down on your photo opportunity. Likewise, bubbles can rise up
to spoil your photo. When a buddy moves lower down, her bottom time becomes
shorter, which is undesirable.
moving arms: most buddies have never unlearnt the habit of beating
their arms for stability or by way of swimming or to remain buoyant. It
has a devastating effect on your opportunities, as it scares fish witless.
Never move your arms suddenly! Usually wrong buoyancy is the main cause.
In many cases it takes a year to unlearn!!!
buoyancy: whereas the photographer often has to steady himself down,
the model or buddy should always be precisely trimmed. Wrong buoyancy leads
to excessive use of arms and kicking dust up, or not being able to hold
her pose.
dust: dust is one of the worst problems. If the buddy swims ahead
in a current, as suggested above, the photographer arrives in her dust,
so in this situation she must stay behind him. Kicking up dust is usually
caused by incorrect buoyancy. When rising up from the bottom, use your
lungs and take a very deep breath, then with your fingers, push yourself
up from the bottom. Resume kicking only when completely free. Tip: small
soft fins produce much less dust than long hard fins.
currents: strong currents are not conducive to good photography
but if there is no current at all, the dust and debris does not flow away.
Plan your dive against the current, as this is also safer and makes the
return easier. Most currents are related to the tides. Mark neap tides
on your calendar for the best diving opportunities, because then the currents
are minimal and also the water clearer.
air bubbles: bubbles are unavoidable but when they disturb the subject,
are a damn nuisance. Photographers must be able to hold their breath for
prolonged times, in order to enhance their opportunities and not to shake
the camera. They must also wait for a pause in the wave action. Of course
the model does not know this, and breathes out at alll the wrong moments,
bubbles hiding her face and eyes. So, time your breathing with the peak
of the wave motion, and after the shot was taken. Models please watch the
breathing of the photographer to get a clue.
sign language: there is no photographers' sign language, and you
will develop your own. Wherever you are doing serious shoots with models,
go up to the surface to discuss the situation, so she'll understand what
is expected.
donning gear: because the photographer has so many things to do
and check and wear, a buddy must be entirely self-reliant. She must don
her own gear and get back on board without the photographer's help. Sorry.
finding objects: while the photographer is spending much of his
dive time peering through a small rectangle, the buddy is often free to
go ahead and explore. Naturally she is the chosen one to find new subjects.
Now she needs to tell the photographer, and wait and wait for the right
moment when the shoot is done. Then she must be able to remember where
this object was, and this very often fails. Thus a model must have good
spatial orientation but it's a lot of fun.
modelling: many girls like the kudos of being a model but underwater
models better beware.
outfit: her outfit is the best, without blemishes and with the least
of clutter. So it is her responsibility to put it on in such a way that
the cluttering objects are tucked away and not half visible.
clear mask: a model's mask must be spotless, without steam inside
or water under the nose or a bloody nose for that matter. But often
she cannot see what the photographer sees, so be prepared to clean your
mask under water, which can be unpleasant.
breath-hold diving: some of the most exciting photographs have a
free-diving model without the clutter of tanks and BCDs and heavy belts.
When free-diving, the model has trained herself to hold her breath for
at least 30 seconds, such that she can swim to her position, the water
closes overhead with the ripple pattern as if undisturbed, and enough time
to make two photos. Phew! Then do it again and again. Should you have such
a model, don't tell anyone because you'll lose her :)
playing: taking photos of models in situations requires a mix of
direction and freedom. Sometimes the photographer's creative idea directs
the shoot but then again, sometimes (and this can be very often) the model
makes the picture and the photographer just grabs each opportunity. It
can be very rewarding. We call it playing. Good models have
some grace and elegance in the way they move, and when they play,
wow!
fear: fear for the environment, unfamiliarity or political correctness
(please don't touch anything) can diminish your opportunities considerably.
Both photographer and model must have a good knowledge of the environment
and what is really dangerous.
camera care: camera care is entirely the photographer's responsibility.
But so often a helping hand is on board with dry hands and can be the gopher
for changing a film or lens. Often the buddy does not dive because the
photographer is usually more motivated, and then it would be so nice if
she could change a film or lens skilfully and safely.
What
is skip-breathing and how do you do it safely? We all need to breathe to
stay alive. When working hard, we need to breathe more than when sitting
still and the body regulates this by taking deeper or more shallow breaths
and also by the frequency we breathe. So why skip your breathing?
Under water we breathe compressed
air and at 10 metres depth this air has twice the concentration of oxygen
at the surface (at 20m 3x, at 30m 4x etc.). The body's breathing regulator
does not know this, and we keep breathing at normal rates, consuming less
of the oxygen that is there. Our breathing impulse works on the amount
of carbondioxide in our blood (not on the oxygen level), and having consumed
the normal amount of oxygen, we end up with the normal amount of carbondioxide,
prompting a new breath. So the extra oxygen is breathed out unused.
Skip-breathing consists
of consciously ignoring the urge to breathe in order to consume the remaining
oxygen, which of course raises the amount of carbondioxide in the blood.
Skip-breathing does not work well at the surface, but the deeper you dive,
the better it works and saves air. It works best between 10 and 20m. The
problem is that a raised carbondioxide level in the blood is poisonous,
causing symptoms identical to a migraine when overdone. But it can't kill
you even though a migraine may last all day.
The symptoms are a head
ache combined with neck cramp - discomforting but you won't need to stop
diving for it. The good news is that your body can get used to raised levels
of carbondioxide without causing a migraine. You just need to ease into
it during an expedition. If you don't dive frequently, you won't be able
to skip your breathing by much.
When you do work under water
or swim a lot, you can't gain much from skip-breathing. It is really for
the very calm photographers and it works best when you move very little
indeed. Being perfectly trimmed and swimming streamlined in a perfectly
horizontal position is the secret.
Being frugal with air brings
another advantage. I now dive with 8 litre tanks (60 cuFt) which still
gives me a dive time of over an hour in most cases.
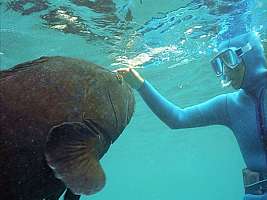
f031613: unstructured behaviour of the model, or playing
can lead to surprising moments like befriending a wild giant spotted black
grouper (Epinephelus daemelii). It took 3 hours to get here. 28mm
lens.
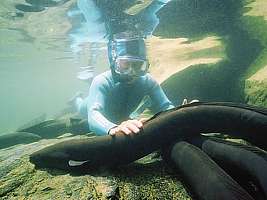
f027512: longfinned eels (Anguilla dieffenbachii)
showing no fear of the model in a freshwater stream. It takes much patience
to get to this situation, while time is running out due to the cold. 16mm
lens.
Assisted
snorkelling with a pony tank I've missed some terrific
opportunities with dolphins because I could not stay down long enough while
also keeping up with them. The solution was simple: assisted snorkelling
with a pony tank. A pony tank is a very small tank (2 litre, 15 cuFt) which
does not impede snorkelling much. Attached is a regulator and contents
gauge. You wear it while snorkelling, without BCD of course. When you need
to stay longer than breath-holding allows, the air is there and you can
complete your photo sequence, resulting in fabulous shallow water opportunities
while degassing from a previous dive. It allows you to go deeper and stretch
your bottom time, because you know that you can always reach the surface.
It is particularly valuable for balancing a freediver's weight at, say
15m depth. This is where you become too heavy and begin sinking (depending
on the thickness of your wetsuit). A single breath overcomes this problem
and makes you weightless again, thereby saving much energy. So a pony tank
extends your freediving considerably and thereby also your chances. Believe
it or not, but this little tank can last for an hour.
I use it a lot for spot
dives to see what the environment is like. Such spot dives may take me
to 40m depth where trimming by one's lungs only, becomes a problem (again,
depending on the thickness of one's wetsuit). During such dives one should
also bring one's dive computer. Spot dives typically consist of swimming
a long distance with the least amount of friction. They last 20 minutes
at most on a tank this small, but the distance covered can be substantial.
Note that you need an oldfashioned
'backpack' to mount the pony tank on, and finding one has become very difficult
since modern BCDs also function as integrated backpack.
Camera
housings The era of building your own waterproof housing has perhaps come to
an end. Yet knowing the technology of sealing will help you look after
your gear and perhaps prevent that disastrous flooding (see tips and tricks
chapter, in progress). Camera housings are now offered in all developed
nations for competitive prices. You will have to make a trade-off between
price and sophistication. This is not the place to guide you through the
minefield of options. Many books are doing this and are becoming obsolete
as rapidly as newer camera housings enter the market. Many good Internet
sites exist to help you choose and buy.
My advice is to buy the smallest housing (both for flash and camera)
with the most controls (the dearest). You'll notice that the cost of the
housing often exceeds that of your camera and lenses. A small housing weighs
less above water, is easier to push through the water and is also easier
to carry along. Your housing will have a selection of 'ports', the glass
between your lens and the water. Wide angle lenses need dome ports whereas
normal and tele lenses work fine through a flat port. Often plastic dome
ports are not optically precise or they are not precisely placed, thus
reducing the sharpness of your lens. Wide angle lenses for the Nikonos
3-5 underwater camera do not have this problem but this camera is rather
primitive and no longer in production.
It is very important that you can observe the whole frame of the viewfinder
through your mask. 'Sport' finders are unacceptable for good photography.
Likewise close-up frames such as used for Nikonos cameras are not really
adequate. Make sure your housing allows you to mount both a quality macro
lens and one 2 or 4 diopter close-up lens or filter.
Please note that the Nikonos RS (Reflex System) is perhaps
THE most sophisticated and easiest to use camera with the sharpest lenses
ever made. I have been using this camera to full satisfaction since 2002.
A full chapter will be devoted to this camera and how best to use it.
Managing
resources Every diver sooner or later learns to manage his vital resources. When
running out, the dive must end. But photographers have to manage a few
more. Here they are and some advice on how to stretch them to last longer.
Dive air: sooner or later you will have used up all the air in your
tank. The deeper you go, the sooner. The era of sudden dive endings is
over because of contents gauges and dive computers. You must
have a computer, because this allows you to stay longer and go down or
up as you like in your dive profile. It allows you to plan your dive under
water.
Although some dive institutions advise not to skip-breathe (holding
one's breath), this is still a safe technique to extend your bottom time
considerably. A good diver with a 12 litre tank (90 cuft) is able to stay
at 5-10m depth for over two hours! A headache with neck pain (like a migraine)
signals that you are overdoing it and you can adjust your technique accordingly.
The first dives of an expedition are always the most sensitive to skip
breathing, so get into it gradually. Air can be saved by not swimming fast
and particularly by compensating one's buoyancy precisely and frequently.
Learn to become perfectly balanced to swim horizontally.
Dive time: if your air hasn't run out, your dive time will, particularly
during deep dives. You can extend your underwater time considerably by
not using up all 'no stop' time at depth, but instead returning to the
shallows earlier. Here you can also use up all safety air under 40bar/500psi.
Body heat: the colder the water, the shorter your stay. The deeper
you dive, the thinner your wetsuit becomes, and the more your inhalation
air cools your lungs. You can extend your stay by wearing thick wetsuits
but these require heavy weight belts. Most important is that your suit
fits well and does not allow exchange of water. A hood comes next, then
booties and finally gloves. Your hands are able to shut off circulation
quite easily. For very cold conditions, use a drysuit but these are not
a panacea. The air bubble within makes diving unpleasant and it affects
many aspects of photography.Note that a lot of a diver's hypothermia arises
from breathing compressed dry air. While air expands in the first stage
of the regulator, it becomes cold air and super-dry. In the lungs this
leads to abnormal evaporation of body liquids, which cools the body rapidly.
Note that a freediver does not have this problem.
Slow hypothermia: most diving results in acute hypothermia, characterised
by feeling cold, followed by shivering. It is the safest form of hypothermia
because it gives very clear unpleasant signals. What you need to watch
out for is slow hypothermia, which can occur by staying wet for too long;
standing in cold wind and so on. Make sure you recognise it because it
can be a slow killer. Slow hypothermia does not give strong shivering but
is first noticeable by feeling lacklustre. On cold days, make sure you
get into dry clothes again with a jacket to protect from the wind. When
your wetsuit is wet, while in a boat, you will suffer slow cooling until
the wetsuit dries up from the outside. If you need to wear it, wear a wind
jacket over the top. It makes an ENORMOUS difference.
Fatigue: as you grow older or become unfit, fatigue sets in earlier.
You'll miss out on the third dive of the day and give some night diving
a miss. In order to make the most of your expedition, you'll need to be
well prepared and trained beforehand. Don't indulge in excess alcohol during
the trip, get good sleep and light meals. Let the doctor check if your
hormonal levels are normal (Testosterone!). Note that some alcohol can
be beneficial. When feeling very cold, particularly in feet and limbs,
a small amount of liquor (brandy, whiskey) can help you get warm very much
more quickly. I always store an emergency flask of brandy on board and
beer in the cold bilges.
Being fat: fat divers know that they are a greater risk to decompression
because fatty tissue absorbs nitrogen gas in higher densities while releasing
it more reluctantly, just as smokers know that their lungs could rupture
more easily during ascent. But what is insufficiently known is that belly
fat takes space that would otherwise have been used for breathing. A wetsuit
furthermore exerts pressure on the chest, and these two factors make that
fat people run out of breath very quickly. They can seem fit and strong
in non-aerobic exercise (such as lifting) but fail badly when air is needed
in aerobic exercise such as swimming back to the boat in a current. You
can't be fat as a good underwater photographer!
alcohol and diving: the politically correct notion is that diving
and drinking do not go together, but this is not strictly true. Sure, a
booze-up may reduce your judgment and sense of responsibility, but divers
routinely experience nitrogen narcosis to the equivalent of one drink for
every ten metres of depth. So, what is so bad about a drink and should
we be dogmatic about it?
headaches: a headache at the end of a dive is so common that divers
don't talk about it. Most headaches come from sinus problems. Being unable
to let air into the sinuses, the tissues rupture and they fill with blood.
Hence that bloody nose at times. Of course you should have taken your Pseudoephedrine
tablet before the dive, but did you know that half or a whole drink of
carbonated alcohol (beer or fizzy wine) helps? It also helps against
those migraine headaches from skip-beathing, but in both cases best when
taken before diving.
seasickness: a single drink of alcohol helps to avert mild seasickness
when taken well in advance. It is thought that the reason drunks swagger
is their loss of a sense of balance. It is this same numbing of the balance
organ that prevents seasickness.
warming up: the general idea is that alcohol should not be used
to warm a patient suffering from hypothermia, because as the alcohol improves
circulation, it also cools the warm heart with the cold blood from limbs,
and the patient dies. But this is an extreme and hopeless case. For divers
who have difficulty warming up after a dive, a toddy of brandy performs
miracles while also warming their feet inside the sleeping bag.
Photographic film: if you run out, you've had a good dive. If you
have film left unexposed, you'll be faced with a dilemma: use it for the
next dive or load a new film? I've seen a professional photographer for
the National Geographic magazine take down over a dozen cameras during
one dive, with the aid of a helper whose task it was to ready them and
to place them at strategic points under water. This photographer would
shoot some 500 frames during a single dive. It is much better to learn
the skills of taking many successful photos with only little waste. You'll
learn these in this course.
Having two cameras, one for wide angle shots and one with a zoom lens,
is definitely an advantage if you can afford it and have a buddy willing
to carry one. Having patient surface support, allowing you to reload film,
swap cameras and go diving again, is also a good solution. Preferably train
someone who stays dry, to reload the film. Cameras are easily damaged by
a single drop of salt water. Tip: use the type of towel cloth wrist cuffs
used by tennis players to prevent water droplets from your wetsuit from
leaking into the camera while changing a film or lens.
Battery life: Practically everything runs on batteries these days.
Movie makers run out of battery power very quickly. Make sure to be able
to charge batteries on expedition. Keep a log of battery replacements in
your various cameras (when was it that you replaced that battery?). Mark
the date of replacement on the battery. Use only long-life lithium batteries.
These are cheaper per unit of electricity and perform better too (more
power in low temperatures and they deliver more current). Most important
of all, learn to switch your gear off when not in use ( my weakness).
Long-life batteries also require you to do fewer changes, reducing the
chance of equipment flooding. My worst mistake on expedition is usually
not switching cameras and strobes off.
The
graph compares temperature performance of Lithium iron disulphide batteries
with Alkaline manganese or 'standard' alkaline batteries. Although their
capacity ratings do not differ very much, they do differ significantly
performance wise. Whereas a standard AA alkaline battery is rated at about
2.5Ah, it can deliver this energy only when used in low current applications
like transistor radios. Once current is demanded as required for recharging
a strobe light, its capacity drops to half its nominal value. When the
temperature furthermore drops to close to 0ºC, it performs at about
a quarter of its rating. Here is where lithium batteriesrated at 2.7Ah,
with their very low internal resistance, , make an enormous difference.
Whereas alkaline batteries degrade gradually, extending the recharge time
from 4 to 10 seconds, lithium batteries die rather suddenly, extending
recharge time from 4 to about 6 seconds, which can be a nuisance.
Note that a D cell has about six times the capacity of
an AA cell and a C cell about 3 times.
Lithium batteries have exceptional shelf life of over
ten years! It means that you can leave batteries in unused equipment without
running the risk of them leaking and damaging it. It also means that their
internal leakage is very low and that they retain their capacity for very
long periods. They are excellent to take with you on expeditions.After
replacing batteries preventatively , the used ones can still serve in other
items like torches, GPS, etc.
Expedition
skills Many of your photos will be taken in far away places, often while out
on a boat with very little comfort and facilities. Such photographic dive
expeditions can become a treasure trove of opportunities or a sequence
of unmitigated disasters. Here are some tips to enhance success.
Scaling up: if you are going on a two week expedition, make sure
you have recently done a weekend expedition. It should have revealed the
weaknesses in your equipment and yourself. If you are going to an extremely
cold or warm place, make sure you have done something similar beforehand.
Health: expeditions have the habit of wearing you down, gradually.
Prepare yourself by starting fit and keeping yourself fit with exercises
that can be done in a confined space (like yoga, push-ups, sit-ups). Treat
the expedition as a training exercise and do not exert yourself on the
first day, but rather build your programme up gradually, from day to day.
Wounds and scratches are a serious handicap to diving. They heal slowly
because of repeated salt water exposure, become inflamed and eventually
prevent you from diving. Just be extra careful and carry several pairs
of surgical gloves for those hand wounds.
Seasickness: getting seasick should never come as a surprise. You
should long before have tested your susceptibility. Take those tablets
when you think you need them. Can seasickness be cured? The literature
denies this - once sick, always sick. But since I had my own boat, I have
never been seasick again, so experience cures some people. Some boats make
you more seasick than others. Slow, rolling motor vessels are the worst;
sailing boats next, and catamarans the best. Diesel fumes and the smell
of vomit are almost certain to make you seasick. If you can choose your
ship, let seasickness be a consideration because it is a very serious and
disabling condition.
Nasal decongestion: most people suffer to some degree from blocked
sinuses. It appears to be related to city life with its challenging fumes.
Don't take your chances but use decongesting pills, particularly in the
beginning of the expedition. The substance Pseudoephedrine is the
stuff that helps, but nowadays you have to sign your life away to get it.
Diving without head aches is just so nice! Very recently a new form of
Pseudoephedrine
has become more readily available, one that is not easily converted to
the street drug P. Alas it is also less effective.
Batteries: make sure you can charge those rechargeable batteries.
How long is mains electricity available each day? Perhaps you need to have
fast rechargers, perhaps a solar panel. Try to standardise the voltages
you use, rather than carrying a dozen different types of battery chargers.
Use long life lithium batteries only. In cold places you need twice the
number of batteries because they perform worse. The
most important expedition skill is just turning equipment off when not
in use and never forgetting to do so. Before going to bed, check
those switches again!
Equipment rinsing: all photographic underwater equipment corrodes
when exposed to concentrated salt water. If you have a facility to rinse
your equipment with fresh water, then do so. Failing that, keep the gear
moist and do not let it dry up because when the salt concentrates it becomes
corrosive. Wrap it in a moist towel; keep it in a cool place; in a sealed
box; out of the sun. Same for your dive gear. Contrary to popular opinion,
fins, masks and wetsuits do better when staying salty, so they do not need
to be rinsed. Plan a big bucket of fresh water as necessary expedition
equipment. Gently wipe your precious lenses dry after each rinse, otherwise
their hard coatings will show spots. I use a bucket with 5 litres of fresh
water for my cameras and this may last for five days before requiring to
be refreshed. Give your regulator a daily dip too.
Check lists: maintain check lists to jog your memory. They represent
your accumulated expedition experience and give you peace of mind. Use
someone else's check list if you have none. Don't forget that roll of paper
tissues and some gaffer or ducting tape!
Better
chances Every good photo requires a stroke of luck because it would be impossible
to control all circumstances. When taking natural photos of unco-operative
subjects, luck becomes even more important. But it is possible and necessary
to make luck strike more often. Learning from other people's experiences
is one way (through books, clubs, magazines) but most you should learn
from your own experiences. Make it a habit to analyse your pictures before
tossing the bad ones in the waste bin. You should see gradual improvement
as you improve your methods. Tallying my mistakes by the following categories
helped me improve my techniques considerably:
Out of focus/ depth of field: photos should be sharply in focus
where it matters. Do you need to guess distance settings? Do you need better
glasses or an auto-focus camera? Do you need to use a faster film? Do you
need to recalibrate your distance settings (for macros e.g.)? Did you shift
the camera after it focused automatically?
Movement blur: do you need to use a faster shutter speed or more
flash light? Do you need to use a faster film? Do you need to use a tripod?
Do you need to click at a better moment (the pause in wave movement, e.g.)?
Do your hands shake? I use a small tripod whenever I can, except for macro
photography. It does give the sharper images.
Exposure: is the film under- or over exposed? Do you need to alter
your strobe light intensity? Is the light optimally balanced for foreground
and background? Do you need to use faster film? Do you need more bracketing?
Do you need to use a more tolerant film? There's never enough light and
every photo entails a compromise.
Wrong moment: did you click at the wrong moment? What do you need
to improve this? How can you anticipate the way a situation develops? Do
you need more skills in handling animals or models? Are you synchronising
with the wave motion? Are you too impatient? Are you too lacksadaisical?
Are you clicking too soon or too late?
Composition/framing: What is the reason you did not compose the
image optimally? Do you have parallax problems? Can you see the image completely
in the viewfinder? Does the viewfinder need calibrating? Did emotion make
you blind? Do you need to brush up on theory? Are you too hurried?
Colour/contrast: The quality of the light changes enormously from
moment to moment, from shallows to depths and from one position to another.
Are the colours right and the contrast optimal for the prevailing conditions?
You may need to aim in a different direction. You may need to use colour
correction filters. Are you using the right film?
Help light: Did your strobe or other light source cause problems
(scatter, bleaching, shadows)? Was it aimed correctly? Did it fill the
way it was needed? How can you improve it? Does your buddy need to help?
Do you need a modelling light attached to the strobe?
Repetition: Some repetition is necessary for bracketing and other
reasons but how many unnecessary repetitions did you shoot? Can you vary
your angle or distance or aspect while repeating shots? Did you forget
what shots you took before?
Irrelevant: how many shots prove irrelevant because you would never
be able to use the result? Did you just click away? Did you think about
what to do with the photo later? Does the photo tell a story and what would
be needed to make it do so?
Experimental: Experimenting is necessary to improve skills, to test
your methods and improvements and to just try surprising ways, but many
fail. Did you learn from the experiment? How can you improve it next time?
Can others learn from your experiment? Did you do it in a systematical
way? Can you do it again next time and include it in your portfolio of
tricks?
Good ones: the ones you wish to keep. They may have been marked
in some of the categories above but do not need to be rejected as such.
Try to treat every photo as the one and only,
last opportunity.
Analysing
your failures I may sound a bit like a
school master but the reality is that you will forget about your failures
or not analyse them properly to learn from them. Have you studied the many
questions above? Do you really know how to recognise them in your work?
Don't be so sure. Cut this page out and keep it handy. You must be asking
these questions all the time, even under water.
Take a sheet of paper and
draw a table with rows for each film and columns for each category above.
For each frame of the film, tick one or more columns that apply. Do it
for each film. A pattern will emerge, showing your wastefulness of resources
(money + time + effort). You need to do something about it and change your
ways. It taught me quickly that I needed a different kind of camera, another
lens, change the strobe bracket, bring variation in bracketing my shots
and much more.
Clouds,
waves and visibility Weather, waves and visibility have a decisive influence on your under
water photography.
Clouds: clouds quickly diminish the quality and quantity of light
under water. You may have to resort to close-up strobe-lit photography.
In temperate seas the amount of light under water in winter may be three
f-stops less than in summer, making winter shoots all but impossible. Blue
skies create opportunities for wide angle lenses. Half overcast skies often
introduce more light under water, particularly inside caves and archways
and on the shaded sides of rock walls. Clouds provide soft lighting, often
good for fish portraits in shallow water, using fast film.
Waves: waves introduce water movement, sometimes creative for the
cinematographer but for the still picture photographer they create extra
problems. It may be necessary to strap extra weight on your belt or to
dive deep. (wave movement diminishes rapidly with depth)Perhaps use a faster
film as well. Large waves are invariably damaging to equipment, particularly
when boarding after the dive. Just give big waves a miss. Seek sheltered
places. Waves stir up sediment and reduce visibility.
Currents: under water life is richest in areas with sea currents
but diving becomes more dangerous. Strap an extra weight on your belt to
improve bottom stability. You may need that tripod too. Currents quickly
carry away the dust stirred up and may be advantageous this way. Most currents
are tidal, allowing only one dive per day on the high or low tide. Make
sure you have alternative dive sites too. In some places the only way back
is over the bottom back to the shore, as if doing a dive inside a deep
cave, because you can't do a decompression stop or safety stop in a racing
current. Be aware.
Visibility: poor visibility invariably leads to poor pictures. Use
wide angle lenses or resort to macro photography. In the shallows, poor
visibility can be used very creatively to accentuate the sun rays penetrating
the water, to shoot misty moods and to separate foreground from background.
Photographer
or diver? Is it better to be a diver who learns to take photos or a photographer
who learns to dive? Obviously both skills are required and more. In practice,
only the amateur photographers who learned to dive, became good under water
photographers. But your prime interest must be photography. Ironically
hardly any professional photographer has made the transition to the sea,
perhaps because it would constitute a considerable loss of income. You
should be familiar and capable of taking good pictures above water if you
ever want to take good under water pictures. Under water photography is
much more difficult than above but above water photography has been refined
to a very high degree, which makes it hard to excel in.
If you have never taken good photos before, don't expect to be able
to take good photos under water. A snapshot on the land taken by an automatic
camera may look great, but that same camera in an under water housing produces
very poor under water pictures.
The most difficult question to answer is: What makes a good photo?
Eventually I narrowed this down to the following list of qualities:
Serve its purpose: many photos are good simply because they do the
job. They are wanted. This is the most important quality but not necessarily
for winning competitions.
Technically pleasing: the technical quality (sharpness, composition,
etc) must serve its purpose. A blurred image is not necessarily wrong.
The technique used must serve a purpose, any purpose listed here.
Best option at the time: shows the skill of the photographer. Can
the image be improved upon? If one can, you have missed an opportunity.
Element of surprise: an unusual situation, the right moment, an
unusual angle, a technical trick. This is usually rated highly in competitions.
Co-incidence of 2-3 themes: for example a leaf, with dew in the
morning sun and a caterpillar gnawing it. Always look for the confluence
of more than one idea and take the time for it; otherwise enact it. This
is also rated highly in competitions.
Tell a story: as above but it is the story that matters, not so
much the photo. An illustration of an idea. Often judges and the public
do not get the story, reason why this type of image does not rate highly.
But in a book, accompanied by text, these photos are the most desirable
ones of all.
Colour: the gaudy colours of the underwater world are addictive,
surprising and pleasing. Colour always wins over monotone. Spend more time
on your most colourful subjects.
Transmitter or receiver? In the photo and film industry
realising ideas and dreams is the mode. The shots are driven by an intense
desire to create, to enact, to fake. It is the transmitter at work,
sending out his ideas and pushing others to fall in line.
While taking movies underwater,
I had a couple of terribly unproductive years, and I did not understand
why. What I was doing, was finding the finishing shots to complete a number
of stories. I had my mind set and wanted nature to comply. I was diving
as a transmitter, wanting my way, and as a result I did not see
the opportunities that presented themselves. I was hopelessly unproductive
because I had my receiver turned off.
Now you know that you can't
both talk and listen, and you also know that those who talk a lot, are
poor listeners, and vice-versa. You cannot transmit and also receive at
the same time. What this means is that if you are out there to take photos
of nature, you must have your transmitter turned off and be receptive
to whatever opportunity that presents itself. I had to tell myself specifically
that I didn't dive for film (but my camera was 100% on stand-by) but for
fun. It was a hard lesson that I won't forget. Think about it.
Light is
all you see Taking pictures is all about light, how it interacts with substance
and how our eyes perceive it. Why can we see three dimensions (depth) in
a two dimensional (flat) image? Why do we see colour? How does colour arise?
Why are some images more pleasing than others? There's obviously a lot
of helpful theory to learn about light and photography, knowledge that
I found extremely hard to obtain. Yet, in this course on under water photography
I have to assume that you know it all or pretend that you don't need to
know. One day, when pushed a little, I may put it all on Internet, because
it did change my life profoundly and it may change yours likewise.
You are supposed to know about the properties of light, film exposure,
depth of field, composition, subject separation, saturation and contrast,
use of filters, use of artificial light, cameras and lenses. Or do you?
 The
graph compares temperature performance of Lithium iron disulphide batteries
with Alkaline manganese or 'standard' alkaline batteries. Although their
capacity ratings do not differ very much, they do differ significantly
performance wise. Whereas a standard AA alkaline battery is rated at about
2.5Ah, it can deliver this energy only when used in low current applications
like transistor radios. Once current is demanded as required for recharging
a strobe light, its capacity drops to half its nominal value. When the
temperature furthermore drops to close to 0ºC, it performs at about
a quarter of its rating. Here is where lithium batteriesrated at 2.7Ah,
with their very low internal resistance, , make an enormous difference.
Whereas alkaline batteries degrade gradually, extending the recharge time
from 4 to 10 seconds, lithium batteries die rather suddenly, extending
recharge time from 4 to about 6 seconds, which can be a nuisance.
The
graph compares temperature performance of Lithium iron disulphide batteries
with Alkaline manganese or 'standard' alkaline batteries. Although their
capacity ratings do not differ very much, they do differ significantly
performance wise. Whereas a standard AA alkaline battery is rated at about
2.5Ah, it can deliver this energy only when used in low current applications
like transistor radios. Once current is demanded as required for recharging
a strobe light, its capacity drops to half its nominal value. When the
temperature furthermore drops to close to 0ºC, it performs at about
a quarter of its rating. Here is where lithium batteriesrated at 2.7Ah,
with their very low internal resistance, , make an enormous difference.
Whereas alkaline batteries degrade gradually, extending the recharge time
from 4 to 10 seconds, lithium batteries die rather suddenly, extending
recharge time from 4 to about 6 seconds, which can be a nuisance.